

Overview
A Dynamic Product Retargeting (DPR) campaign is one of the most effective ways to recover abandoned carts and re-engage website visitors. Using your product catalog, Meta automatically shows personalized product ads to users based on what they browsed or added to their cart – reminding them to come back and complete their purchase.
For Shopify and ecommerce brands, a well-structured DPR setup ensures that your pixel, product catalog, and ad creatives all sync seamlessly. In this guide, we’ll walk you through every step of setting up a Facebook DPR Campaign inside Meta Ads Manager — from creating the campaign and selecting the catalog to retargeting audiences, UTM tracking, and publishing your ad.
Prefer the checklist version? Download the Facebook DPR Campaign SOP PDF here
Shortcuts ✂️
- Creating the DPR Campaign in Meta Ads Manager
- Catalog Selection and Naming Conventions
- Performance Goal and Conversion Event
- Retargeting Audience Setup
- Ad Creative & Copy
- UTM Parameters and Tracking
- Call-to-Action and Publishing
- FAQ
Step 1 – Create Campaign
Inside Meta Ads Manager, click Create on the top left. Keep the buying type as Auction
This starts the campaign setup process.
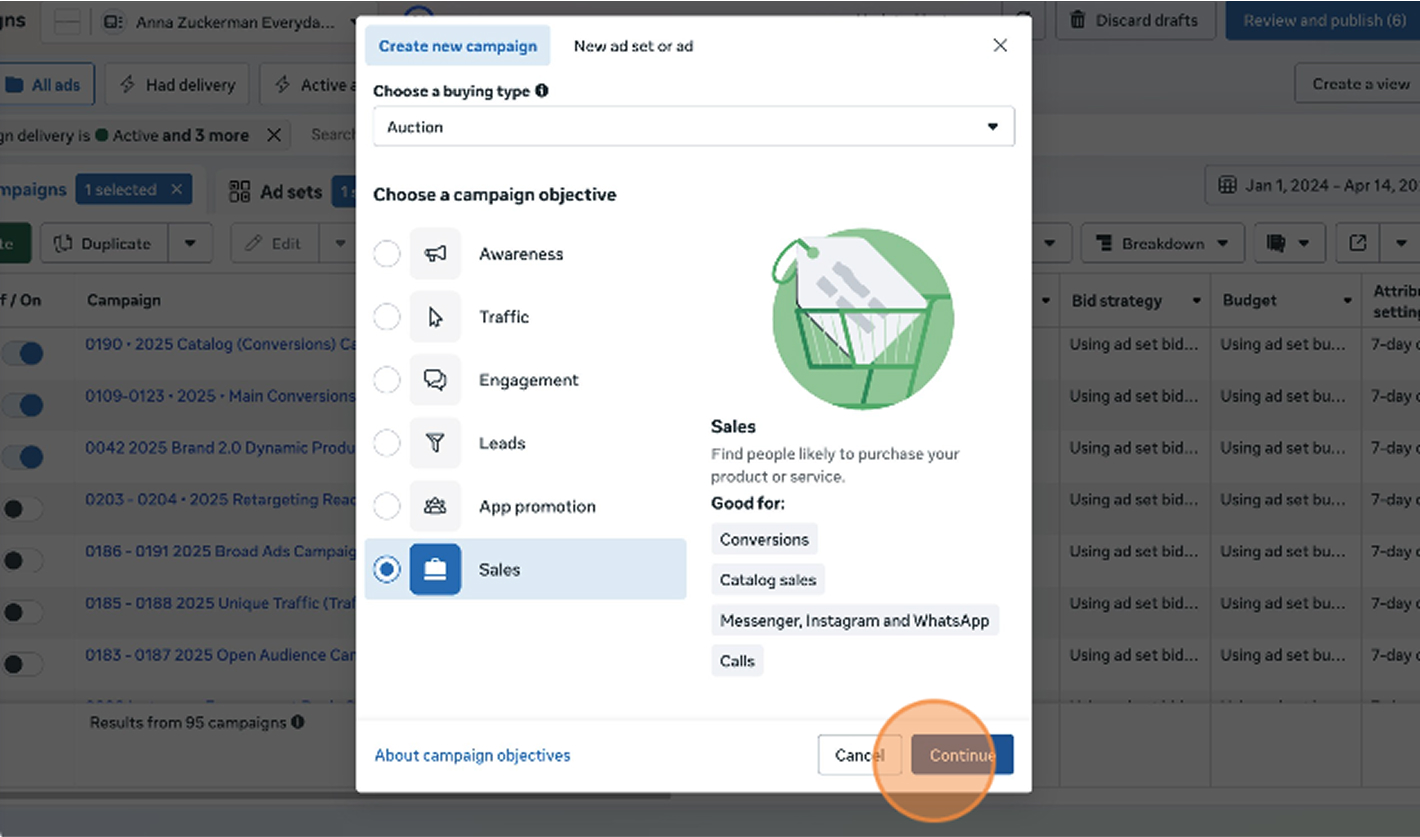
Step 2 – Select the Sales Objective
Select Sales as your campaign objective. This tells Meta to optimize for conversions and unlocks access to catalog sales and dynamic product features. Click Continue to proceed.
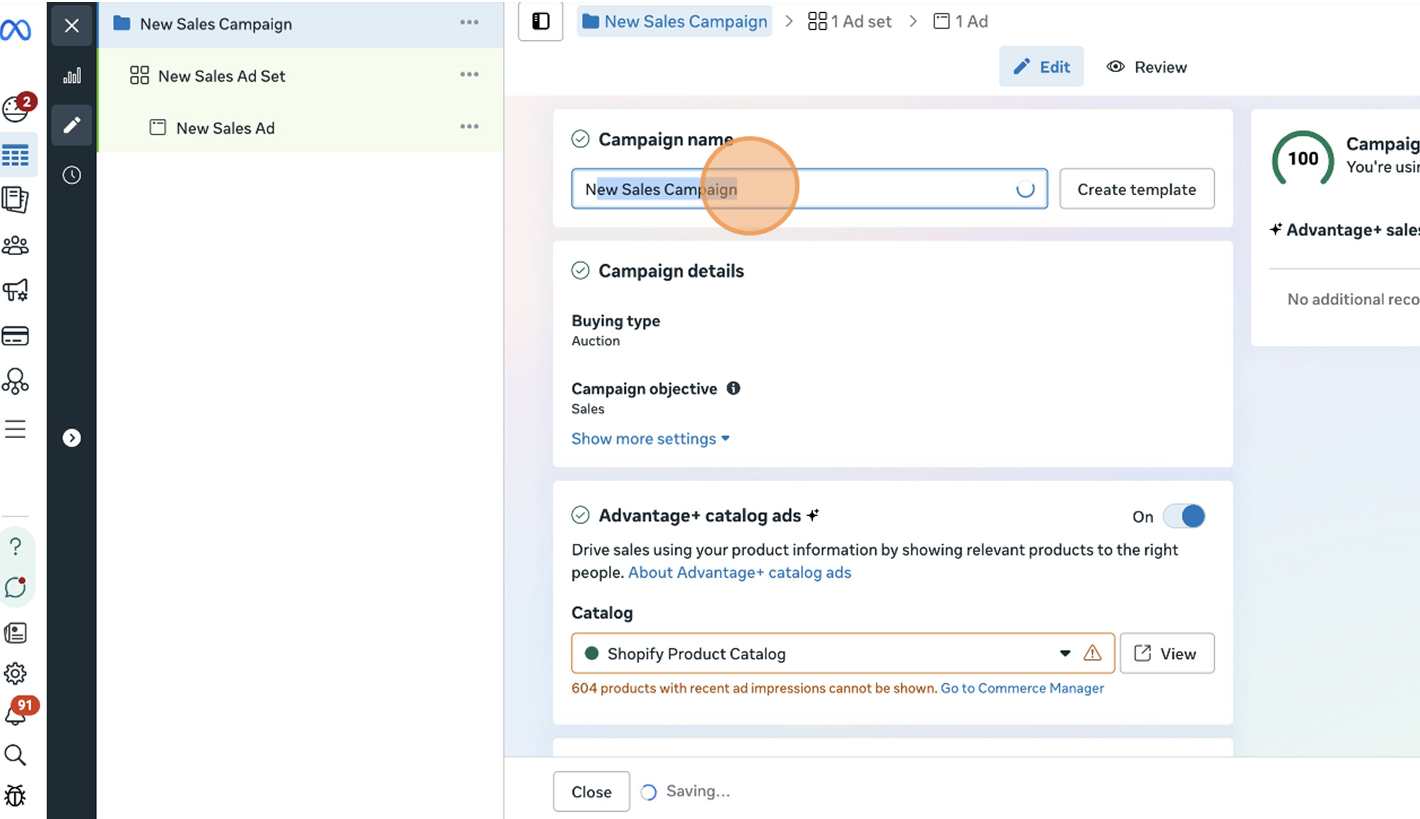
Step 3 – Name Campaign & Select Catalog Ads
Rename your campaign using a consistent structure such as “Number – DPR – Year – Campaign Name.”
Example: 0186 – DPR – 2025 – Retargeting Sale.
Then, turn Catalog Ads on and select the correct product catalog for your store.
This ensures your ads dynamically display real products with up-to-date prices and availability.
Step 4 – Name Your Ad Set
Rename the ad set using the same structure, ending with “Ad Set.”
Example: 0186 – DPR – 2025 – Retargeting Sale – Ad Set.
Consistent naming helps you stay organized when managing multiple ad sets.
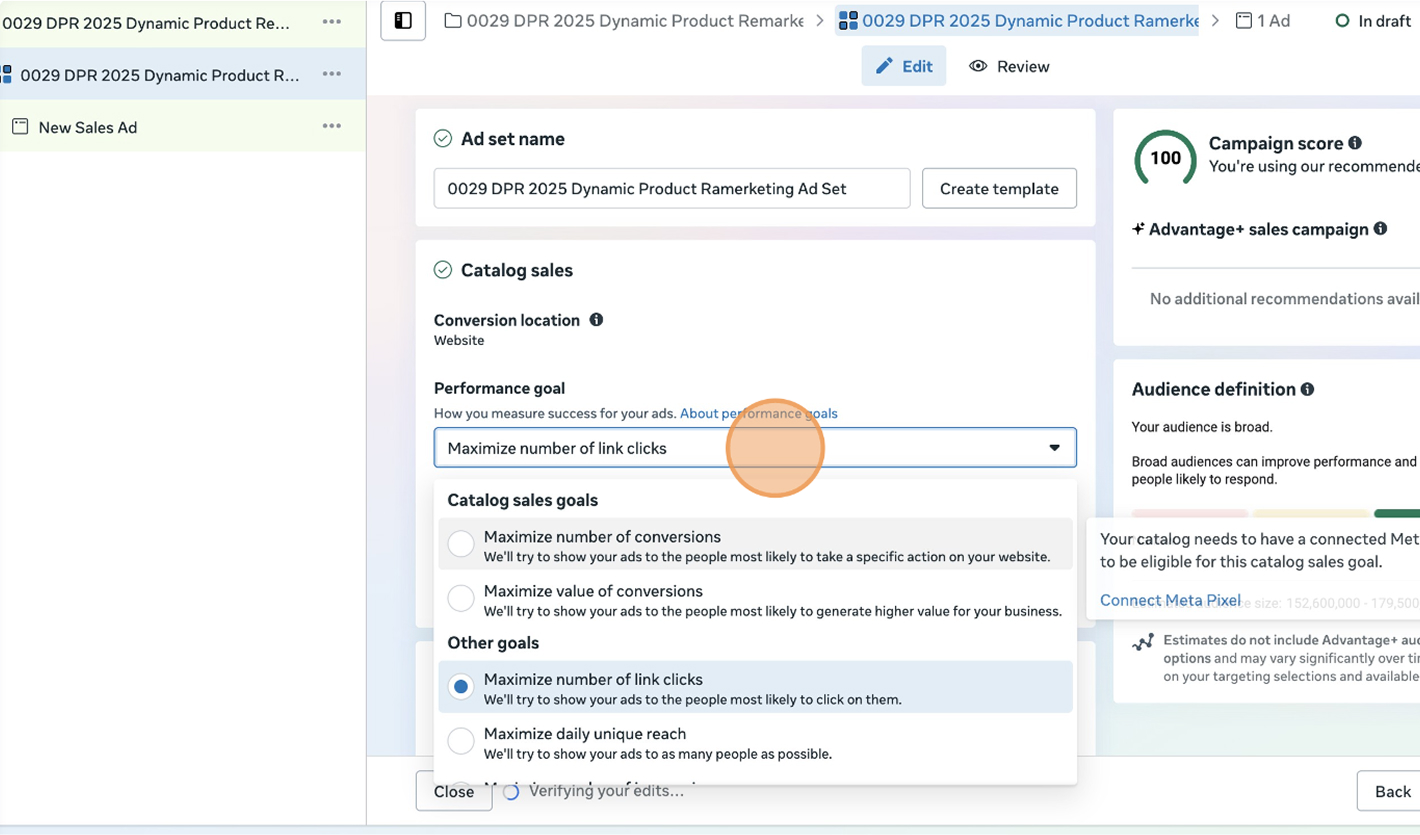
Step 5 – Set Performance Goal
Under Performance Goal, select Maximize Number of Conversions.
This directs Meta’s delivery algorithm to focus on users most likely to purchase based on prior behavior and pixel data.
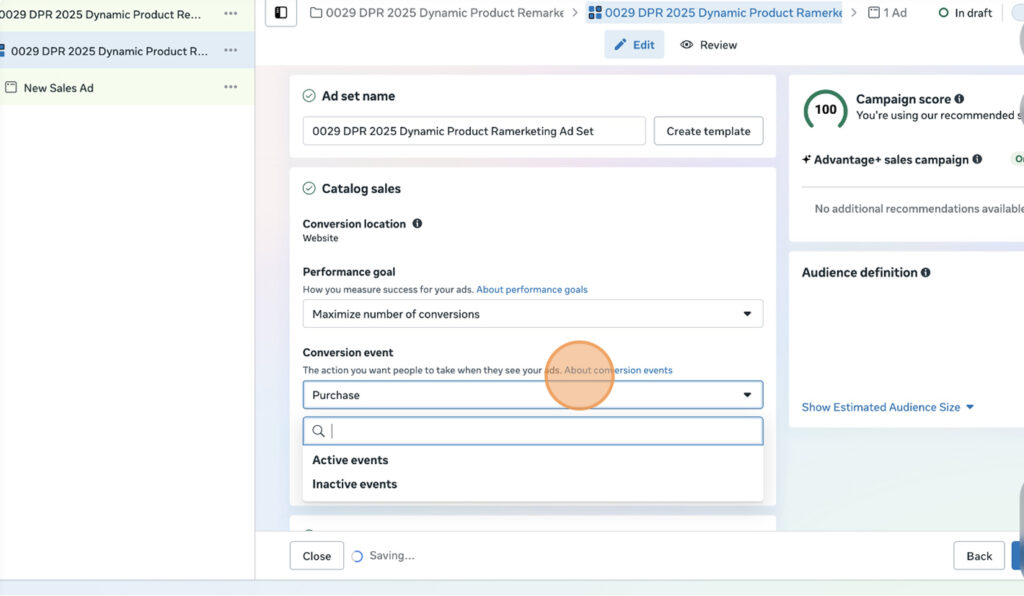
Step 6 – Choose Conversion Event
Under the Conversion Event, select Purchase.
This ensures that Meta tracks completed sales on your website as the main optimization goal.
Step 7 – Select Product Set
Choose your Product Set within the connected catalog.
You can use an entire catalog or narrow it to specific product categories or collections for better targeting control.
Step 8 – Configure Retargeting Settings
Select Retarget ads to people who interacted with your products on and off Facebook.
Choose how far back you want to retarget — for example, ViewContent, Add to Cart, or Initiate Checkout users within the last 30 days.

Step 9 – Rename Your Ad
Name your ad following the same pattern:
0186 – DPR – 2025 – Retargeting Sale – Ad.
Keeping naming consistent across all levels makes analytics and reporting easier.
Insert Screenshot: “Ad naming section.”
Caption: Renaming your ad for clear reporting structure.
Step 10 – Headline & Primary Text
Edit your headline and primary text.
Include dynamic product details such as {product.name} and {product.price} so the ad automatically pulls data for each viewer.
Example headline: “Still thinking about {product.name}? Grab it before it’s gone!”
Example primary text: “Your favorites are waiting. Complete your order today and enjoy fast shipping!”

Step 11 – Website Events
Under Tracking, ensure Website Events are enabled.
This connects your Meta Pixel and allows Meta to attribute purchases correctly to your dynamic product ads.
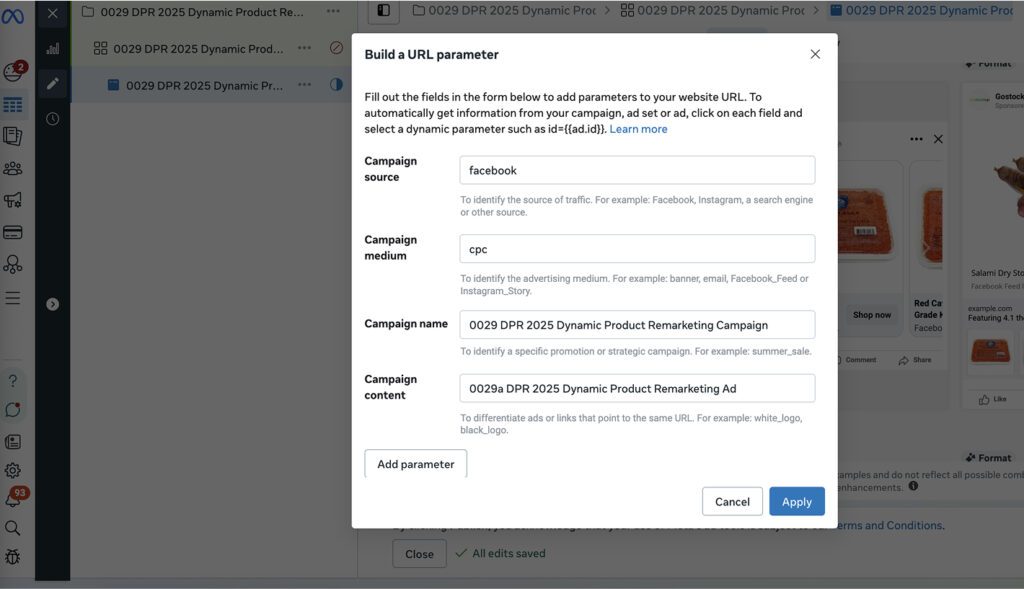
Step 12 – Add UTM Parameters
Expand Build a URL Parameter and add UTM tags for analytics tracking.
Example setup:
- utm_source: facebook
- utm_medium: paid_social
- utm_campaign: 2025_dpr_campaign
utm_content: ad_01a
Step 13 – Choose Call to Action
Select the CTA that fits your goal — most DPR ads use Shop Now or Learn More.
Check that the CTA displays properly in the preview before publishing.
Step 14 – Publish Ad
Review all campaign details — catalog, budget, audience, and creative.
Once confirmed, click Publish to launch your Dynamic Product Retargeting campaign.
Monitor performance in Ads Manager to ensure events are tracking properly and ads are delivering as expected.
FAQ
What is a Facebook DPR Campaign?
A Dynamic Product Retargeting (DPR) campaign automatically shows personalized product ads to users based on their past interactions with your website or catalog.
How is a DPR campaign different from a regular retargeting campaign?
Regular retargeting uses static ads. DPR campaigns dynamically pull specific products and prices from your catalog, showing each user what they’re most likely to buy.
What catalog should I use?
Use the catalog synced with your Shopify or ecommerce store to ensure product data (titles, images, and prices) updates automatically.
How long should DPR ads run?
Most brands run them continuously, refreshing creatives every 3–4 weeks for optimal performance.
Can DPR campaigns target new users?
Yes — you can expand with broad or lookalike audiences once you’ve built strong purchase data.
Launch Your Dynamic Product Ads
You’ve now set up your Facebook DPR Campaign from start to finish – connecting your catalog, configuring retargeting, and enabling tracking. This setup ensures your audience sees the right products at the right time, helping you convert intent into purchases.
At NANO Web Group, we’ve spent over two decades helping brands grow through smart, data-driven campaigns that convert consistently. If you’re ready to scale your ecommerce strategy and turn dynamic retargeting into real results, book a free strategy call with our team today — and let’s build a campaign that sells while you sleep.