

Overview
With more than half of all U.S. digital ad spend flowing to social networks, Meta’s platforms remain a powerhouse for driving awareness and site visits. A Traffic campaign in Facebook Ads is designed specifically to send people to your website or other destination and is perfect for filling the top of your marketing funnel. However, if you skip key setup steps – naming conventions, conversion destinations, performance goals, budget settings and audience targeting – you risk wasting ad dollars and collecting messy data.
This step‑by‑step guide walks you through creating a Facebook Traffic campaign that delivers qualified clicks and sets you up for scale. We’ll cover everything from launching the campaign and choosing the Sales objective (so you can unlock Catalog options) to naming your ad sets and ads, selecting the correct conversion location, setting a performance goal of maximizing link clicks, building your audience with detailed targeting, configuring UTMs and finally publishing your campaign. By the end you’ll have a repeatable workflow that keeps your ads organized and your tracking accurate.
Prefer a checklist format? Download the full SOP PDF
Shortcuts
Jump to the section that matters most:
- Naming & Catalog Ads – rename your campaign and select Catalog Ads (link)
- Ad Set Naming & Conversion Location – choose where to send traffic (website, app, Messenger or calls)
- Performance Goal – set “Maximize number of link clicks”
- Budget & Schedule – adjust your daily budget
- Detailed Targeting – add demographics, interests or behaviours
- UTM Parameters – configure source, medium, campaign and content tags
- Creative & Publish – upload your creatives, fill out ad texts and launch
STEP: 1 Create Campaign
Start in Ads Manager and click the blue Create button in the top left of the Campaigns tab. This opens the campaign creation wizard and prompts you to pick a buying type and objective.
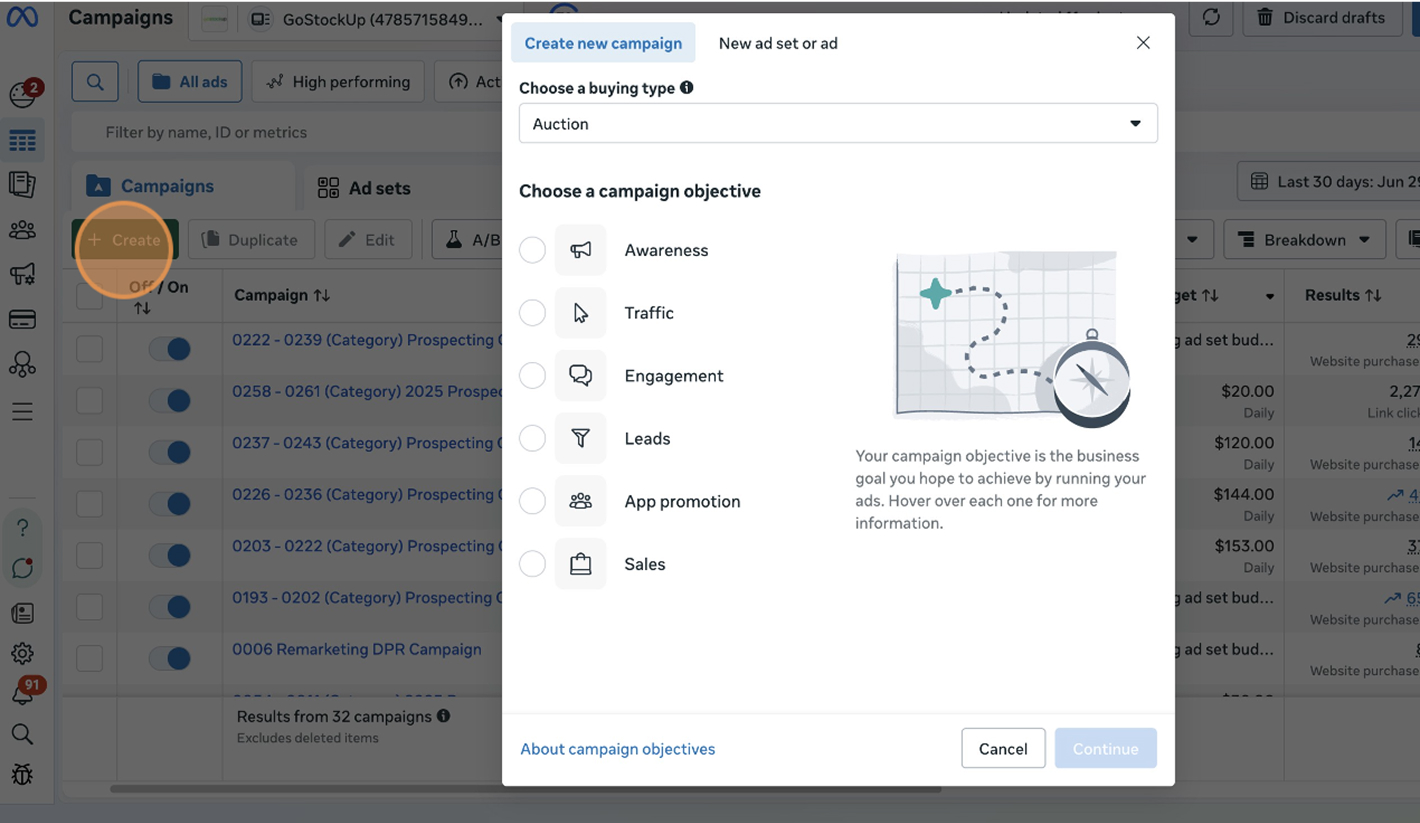
STEP: 2 Select Sales Objective
Since we’re building a Traffic campaign, choose Traffic as your objective. After selecting traffic, click Continue.
STEP: 3 Define Audience Targeting
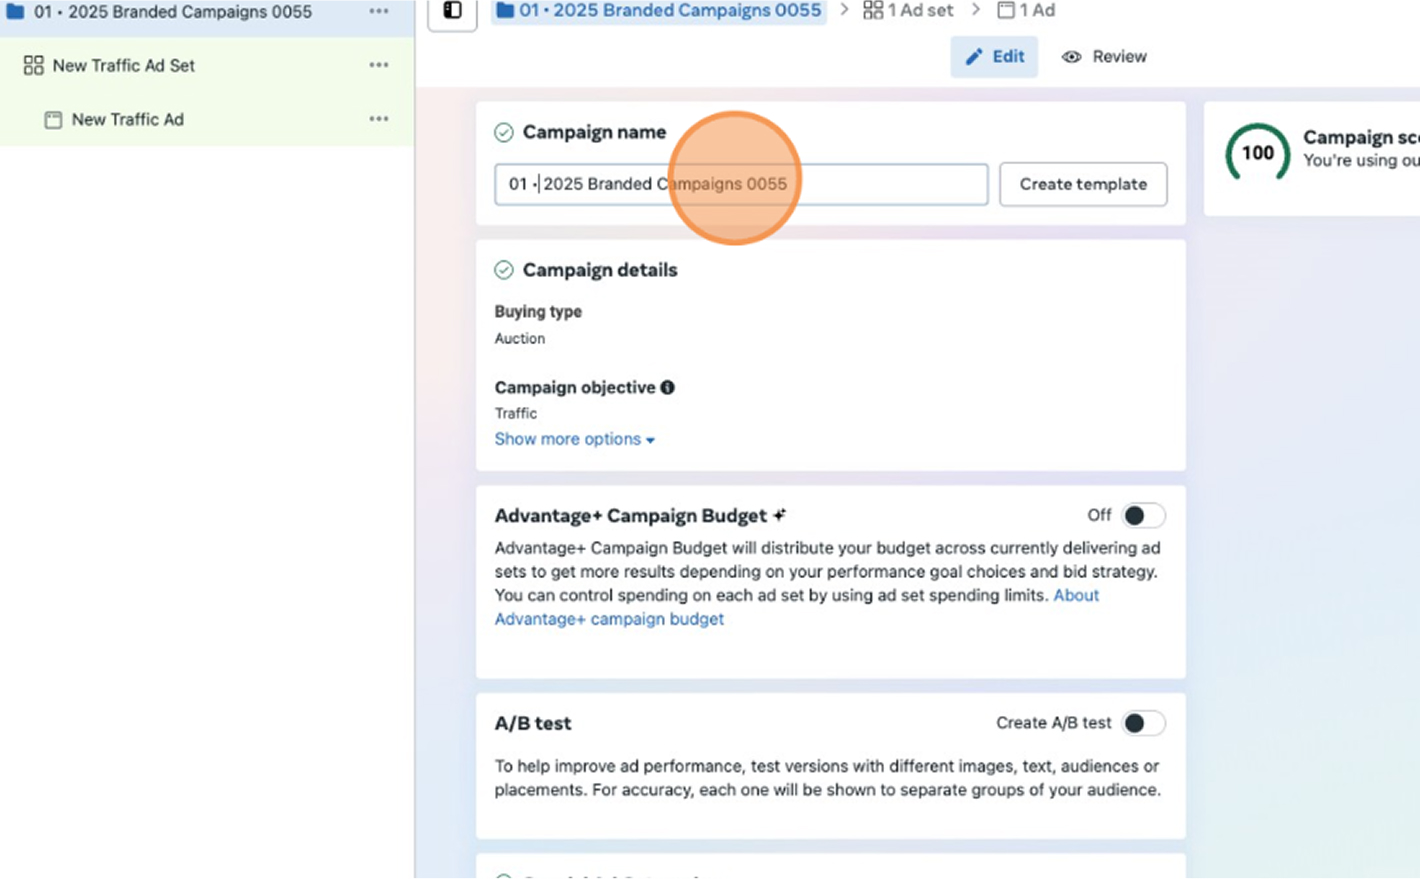
Use a consistent naming convention so you can easily filter and report on campaigns. We recommend “number – year – campaign name”. Example: 01 – 2025 – Traffic Campaign. Once named, toggle on Catalog Ads if you plan to pull products from your catalog; otherwise leave it off.
STEP: 4 Name Your Ad Set
Within the same setup flow you’ll be prompted to name your ad set. Follow a similar convention: “number – campaign name – Ad Set”. This naming structure helps you differentiate between prospecting and retargeting ad sets later on. After naming, you’ll configure conversion location and other settings inside the ad set.
STEP: 5 Choose a Conversion Location
Decide where you want users to end up when they click your ad. Options include Website (send traffic to your site), App (deep‑link into your app), Messaging apps (send users to Messenger, Instagram Direct or WhatsApp), Instagram or Facebook profile, and Calls (connect via phone). Select the option that aligns with your goal; for most ecommerce brands it will be Website.
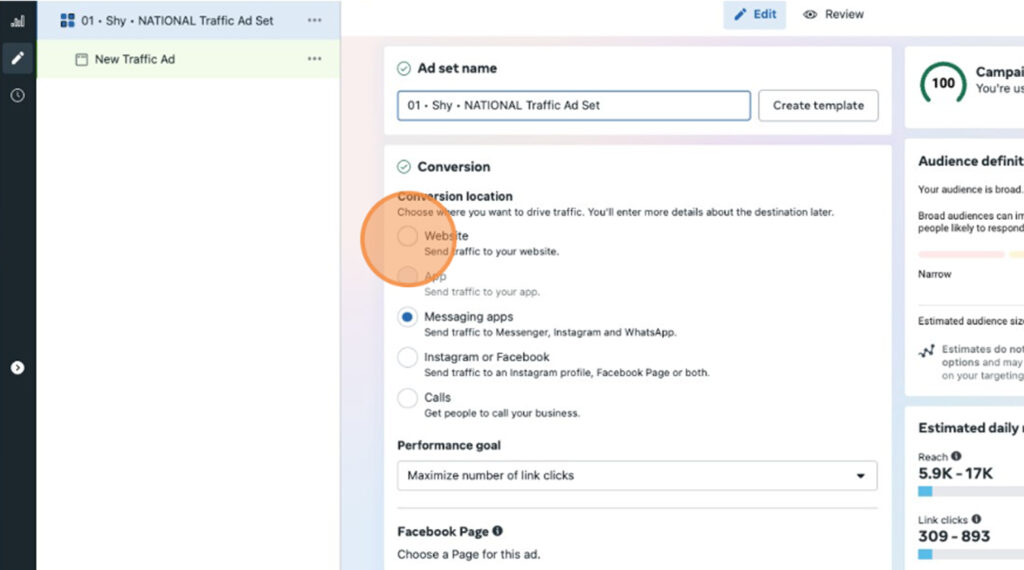
STEP: 6 Set Your Performance Goal
To optimise delivery for link clicks rather than purchases, set the Performance goal to Maximize number of link clicks. A cost per result goal is optional; leaving it blank allows Meta to bid freely to get the most clicks.

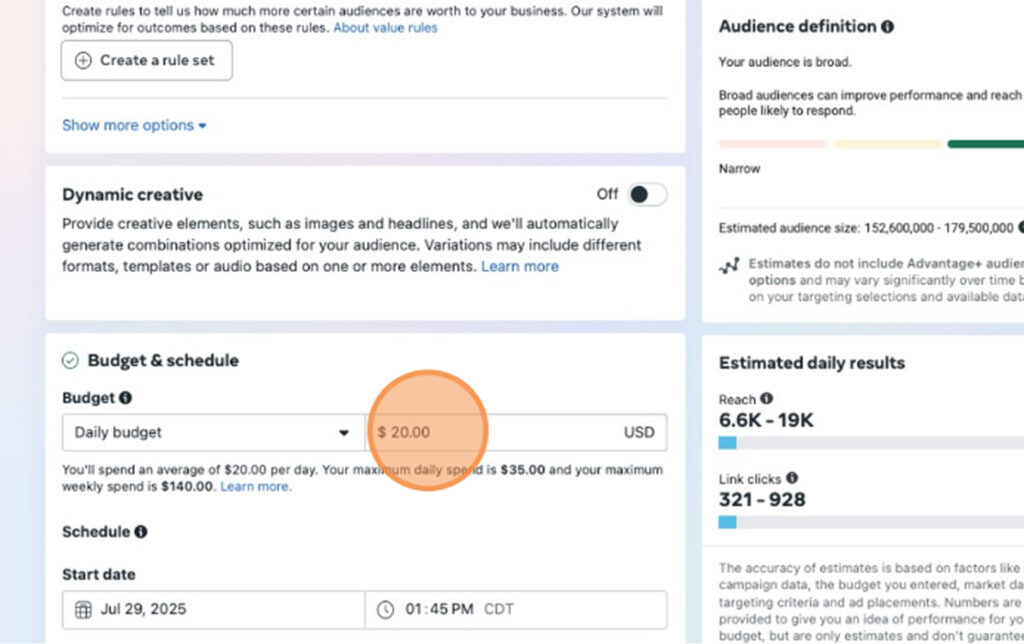
STEP: 7 Budget & Schedule
Choose whether to use a daily or lifetime budget. For Traffic campaigns, a daily budget gives you predictable spend and control over pacing. Enter your desired amount – Meta will display an estimated reach and click range – and set a schedule if you want the campaign to start or stop at specific dates.
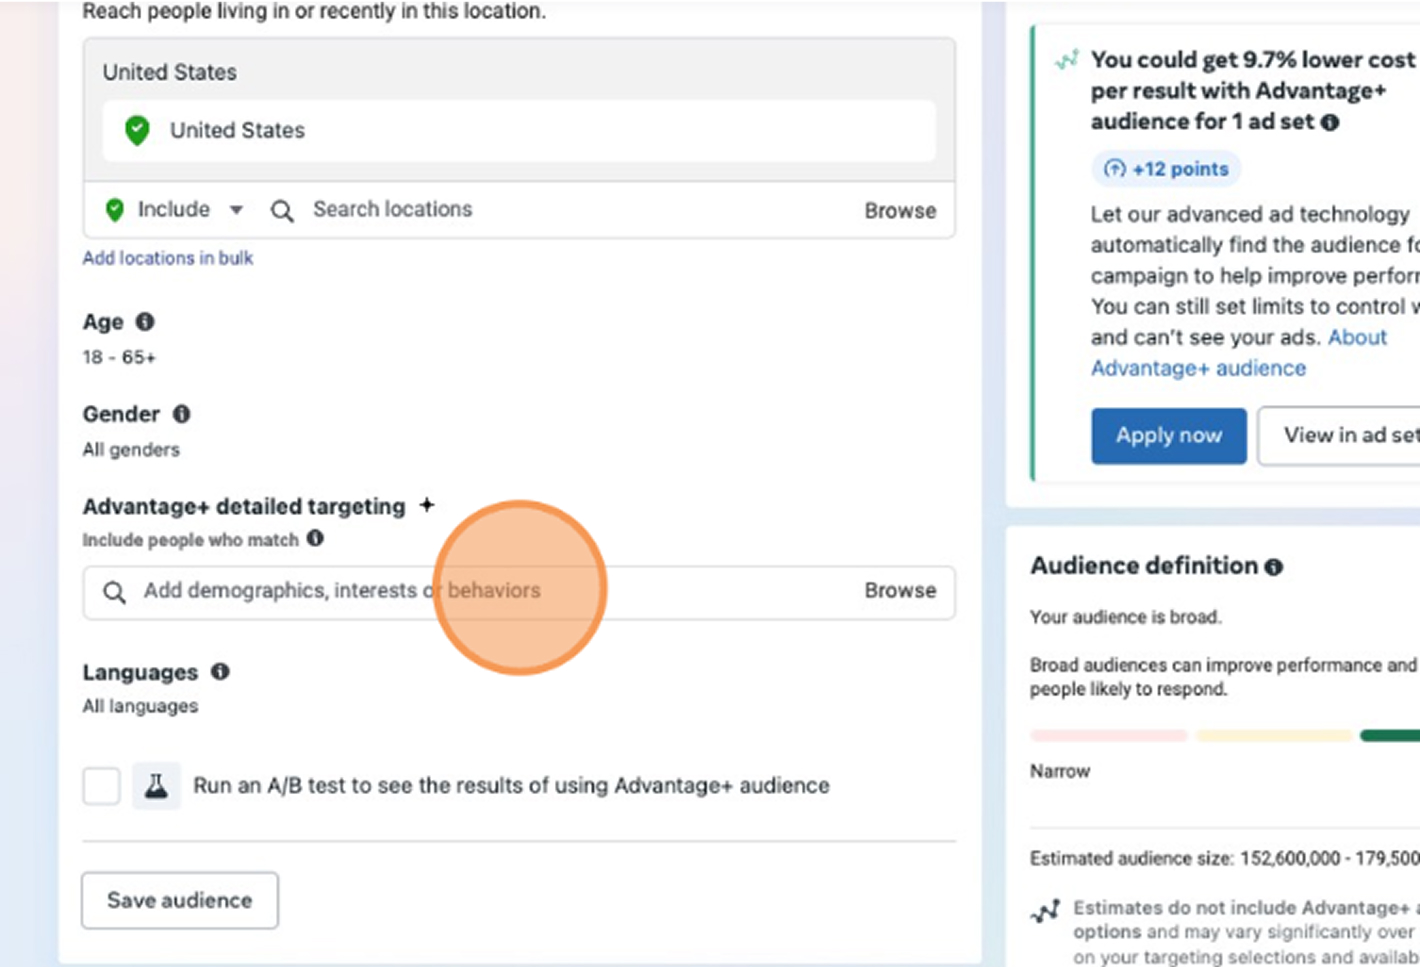
STEP: 8 Define Your Audience
Effective targeting is what makes a Traffic campaign profitable. Start broad by selecting location (e.g. United States), age range and gender. Then use Detailed Targeting to add demographics, interests or behaviours that reflect your ideal customer. For example, if you sell home décor you can target people interested in interior design, DIY projects or luxury furniture. Test several interest groups and exclude irrelevant audiences to refine your reach.
Advanced Targeting Options
- Interest targeting – groups users by topics such as travel, fashion or home décor.
- Behaviour targeting – segments users based on recent actions like videos watched or categories interacted with.
- Hashtag targeting – reach people who engage with specific hashtags.
- Custom audiences – retarget website visitors, your customer list or people who engaged with your app.
- Lookalike audiences – expand your reach by building audiences similar to high‑value customers at different similarity percentages (1 %, 3 %, 5 %, 10 %).
Broad/Smart targeting – let Meta’s algorithm find interested users automatically.
STEP: 9 Placements
Select Manual placements if you want to control where your ads appear (e.g. Facebook News Feed, Instagram Feed, Stories or Audience Network). Leaving placements on Advantage+ (automatic) is acceptable for broader campaigns, but manual gives you more control over creative formats and context.
STEP: 10 Name Your Ad
Following the same naming convention, rename your ad to “number – campaign name – Ad”. Clear names make it obvious which creative belongs to which audience and campaign.
STEP: 11 Set the Destination URL
Enter the web page you want users to visit—typically a product page, landing page or blog post – under Destination URL. Make sure the page is mobile‑optimised and relevant to your ad creative.
STEP: 12 Configure UTM Parameters
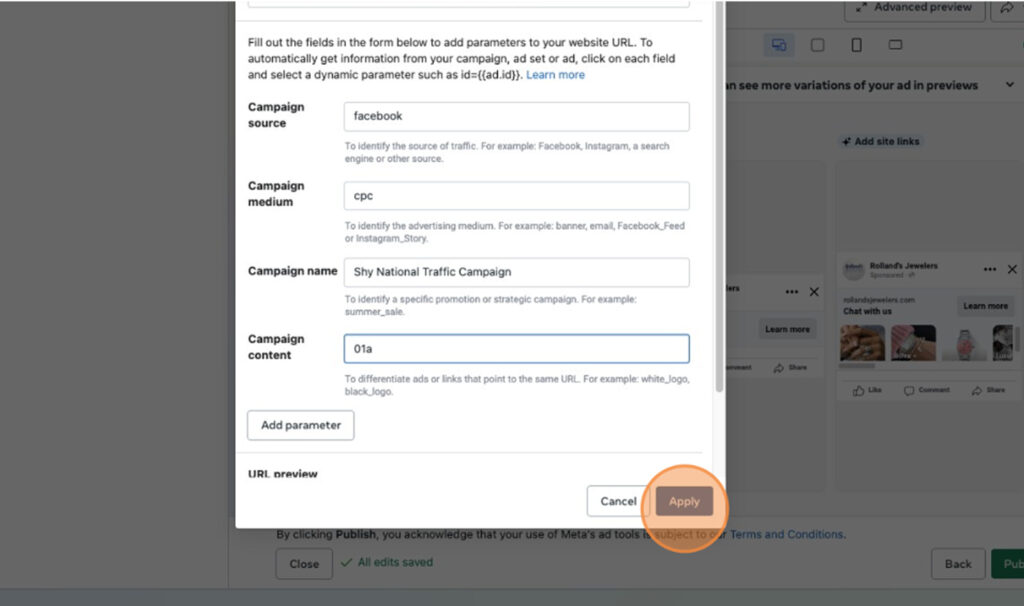
Proper UTM tagging is essential for measuring traffic quality in Google Analytics. Fill out the following fields:
- Campaign Source: the platform name (e.g. facebook).
- Campaign Medium: type of traffic (e.g. cpc for paid ads).
- Campaign Name: brand + campaign type (e.g. nano_traffic_campaign).
- Campaign Content: ad identifier (e.g. 01a).
After entering the values, click Apply to attach the UTMs to your URL.
STEP: 13 Upload Your Creative
Under Ad Creative, upload the images or videos you plan to use. For Traffic campaigns, static images with clear product shots or lifestyle scenes work well. Carousel formats let you showcase multiple products or features.
STEP: 14 Set Up Your Ad Copy
In the final setup stage, enter your primary text, headline and description. Keep copy concise and highlight the value of clicking through. Choose a call‑to‑action like “Shop now” to drive action. Skip the image generation option if you’re using your own creative.
STEP: 15 Select a Website Event
If you have the Meta Pixel installed, choose Website events and select an event to optimise delivery (e.g. Page View or Initiate Checkout). Even though the performance goal is link clicks, setting an event can improve reporting.
STEP: 16 Publish Your Campaign
Review all settings, ensure your naming conventions and UTMs are correct, and click Publish to launch your campaign.
FAQ
Do I need to choose Sales even if I only care about traffic?
Yes. Selecting Sales unlocks Catalog Ads, which you can leave off but need available for future dynamic campaigns. You still set your performance goal to maximise link clicks.
What’s the best audience to start with?
Begin with broad location and age targeting and add a few relevant interests. Then test custom and lookalike audiences as you gather pixel data.
Why are UTMs important?
UTMs allow you to see which campaigns and ads are driving quality site traffic in Google Analytics. Without them, all paid social traffic will be lumped together.
Can I run ads without a Pixel or Commerce Account?
Yes, but you’ll lose valuable conversion data and can’t run catalog sales campaigns. Installing the Pixel (or Conversions API) is recommended for long‑term success.
Launch Your Traffic Campaign
Setting up a Facebook Traffic campaign correctly lays the foundation for scalable, data‑driven growth. By following the steps above – installing the integration, naming campaigns and ad sets consistently, choosing the right objectives, setting budgets, building audiences and tagging URLs – you can confidently send people to your site and measure results.
At NANO, we’ve been helping brands grow through paid social for over 20 years. Our team knows what it takes to transform campaign setup into meaningful business results. If you’d like to see even better performance from your Facebook Ads or need help scaling, we’re here to support you.